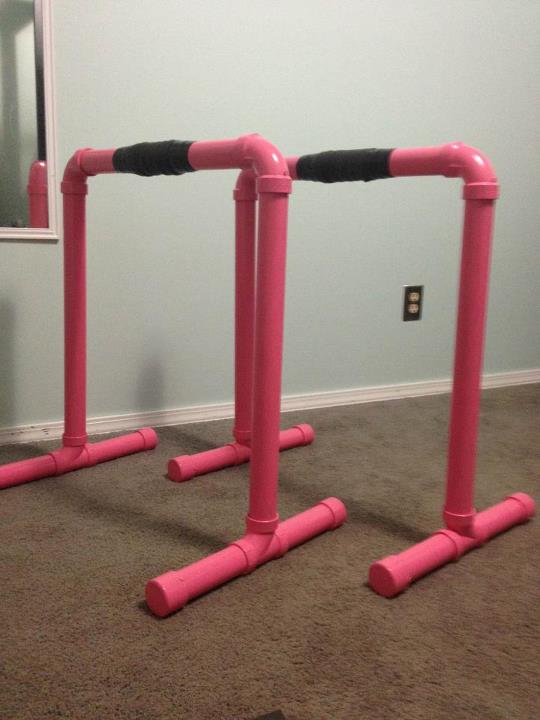
For those of you who are curious, here are the instructions to make your very own Equalizer, as seen on BodyRock.tv. The dimensions are the same as the actual Lebert Equalizer, just the materials are different. The real Lebert Equalizer uses steel, whereas my version uses PVC, which is still very strong. It supports my husband who is 6'3" and about 190#. Cost of materials is about $35. The project was my own personal inception, and the conception was carried out by my husband, who is an architect. So if you are leary of the piece, please know that this project would not have come about if it weren't for him giving me the "okay" to do this project, and he also approved the materials. So here you go... go forth and build your own Equalizer and rock that body!!! PS: I chose to paint mine pink, and I may add silver glitter down the road. If you make one, be creative! I want to see what you guys/gals come up with!
You will need:
(2) 10ft long, 1.5” diameter Schedule 40 PVC pipe
(4) T’s, 1.5”
(4) 90 degree elbows, 1.5”
(8) rounded caps, 1.5”
(1) smallest can of Purple Primer for PVC
(1) smallest can of PVC Pipe Cement
(1) Roll of self-adhesive 2” wide (or wider) pipe insulation tape
(1) Spray Can Valspar Plastic Primer
(2) Spray Cans Valspar Paint of your Color Choice
(1) Coarse sanding block
Something to cut the PVC pipe with. I used a hand saw and a miter block I already had. Ask the guy at Lowe’s or your husband/boyfriend.
You will need to cut the pipes into the following pieces:
(2) 20” pieces (top horizontal tubes)
(4) 24” pieces (vertical legs)
(8) 7” pieces (horizontal floor legs)
After cutting all the pieces, use the sanding block to remove the burrs off the pipe ends. Wipe all pieces clean with a cloth.
Prime all ends of tubes first (about ¾” or so). Prime the inside of all the fittings as well (there is about a ¾” lip inside where the pipe will fit, that’s all you need to prime.
Time to assemble it. Apply cement one connection at a time, it will set up very fast. Apply cement to the inside of the fitting only, be generous. Piece by piece, assemble to make it look like it is in the photo. You might want to “dry fit” everything together before actually gluing it, so that you know exactly what you are doing. Then take it apart and glue it. Make sure you push and twist the pipe into the fitting all the way. Once you glue it, you won’t be able to take it apart in about 10 seconds. So make sure everything is aligned right.
It should be all completely set within a few minutes. Wipe it clean with a cloth.
I tied the middle of the top tubes with some wire and suspended it in the air for painting. Prime well with 2+ coats, use up the entire can. Wait at least 5-10 minutes between each coat. Wait at least an hour before applying finish paint. Apply as many light coats as it takes to conceal all the PVC markings. Let it dry for several hours.
Apply rubberized grip (pipe insulation tape, tennis racket overgrip) as desired.
You’re done!
</p>
Original article and pictures take media.onsugar.com site
Комментариев нет:
Отправить комментарий